Ear piercing is a popular trend, offering diverse styles and personal expression. The process involves creating a hole in the ear, followed by proper aftercare for healing;
1.1. The Popularity of Ear Piercing as a Fashion Statement
Ear piercing has become a popular fashion statement, offering endless possibilities for personalization. Whether it’s a delicate tragus, a bold helix, or a classic earlobe piercing, each style allows individuals to express their unique taste. The versatility of jewelry choices, from minimalist studs to elaborate designs, makes ear piercings a versatile accessory. This trend enables self-expression and enhances one’s aesthetic appeal, making it a captivating way to showcase personal style and explore new looks that never go out of fashion.
1.2. Brief Overview of the Healing Process
Ear piercing healing varies based on the type and aftercare. Earlobe piercings typically heal within 6-8 weeks, while cartilage piercings may take 4-6 months. Proper cleaning and avoiding irritants are crucial. Keep the area clean with mild soap or saline solution, and avoid submerging in water. Redness and swelling are normal initially but should subside. Avoid removing jewelry during healing, as the hole can close quickly. Consistent aftercare ensures a smooth recovery and prevents complications.
Types of Ear Piercings
Explore various ear piercing styles, including earlobe, helix, tragus, and rook piercings, each offering unique aesthetic appeal and placement options for personal expression and beauty.
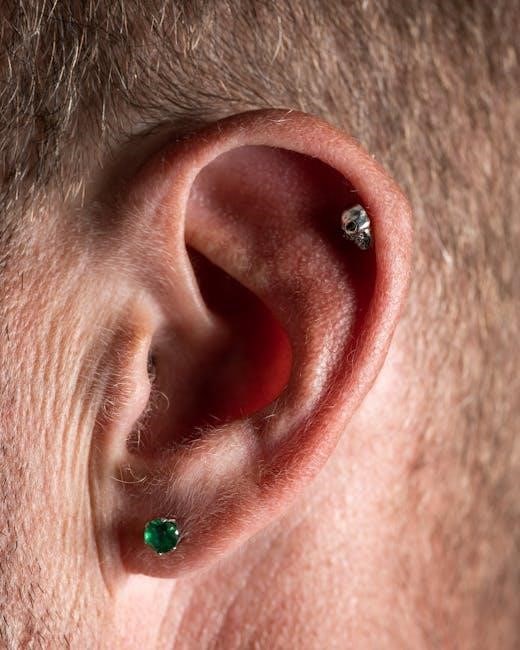
2.1. Earlobe Piercing: The Most Common and Least Painful Option
Earlobe piercings are the most popular choice, known for being relatively painless and quick to heal. Located on the soft tissue of the earlobe, they offer versatility in jewelry styles. Healing typically takes 6-8 weeks with proper care. Keep the area clean, avoid removing jewelry during healing, and maintain a daily cleaning routine for optimal results. This timeless option is ideal for first-time piercings and suits all ages, making it a favorite for its simplicity and aesthetic appeal.
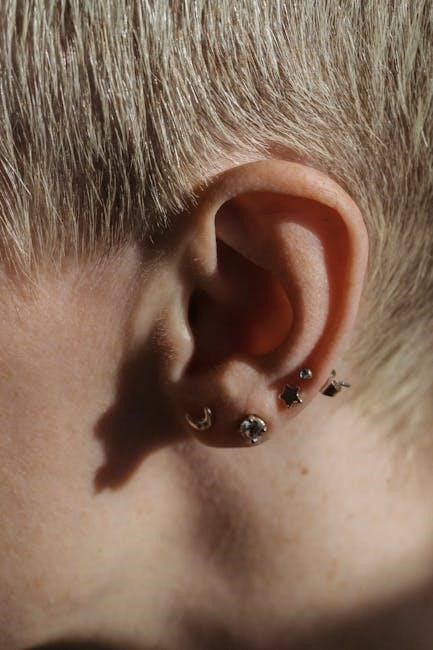
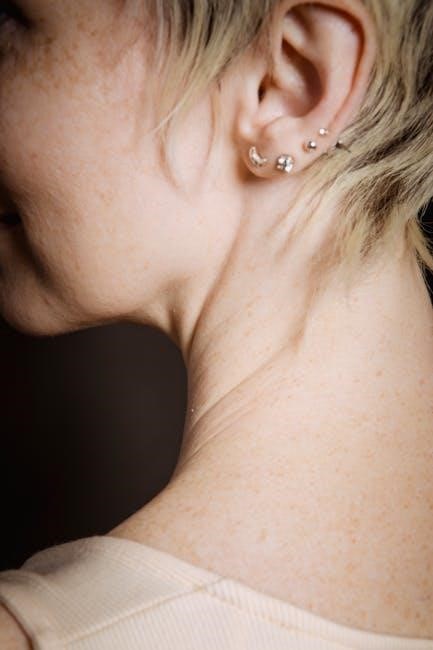
2.2. Helix Piercing: Outer Ear Cartilage Piercing
The helix piercing is located on the outer rim of the ear cartilage. It offers a stylish, edgy look and has gained popularity for its versatility. Healing can take longer, typically 6-12 months, due to the cartilage thickness. Proper aftercare is essential, including regular cleaning and avoiding irritants. This piercing is ideal for those wanting a bold statement, though it may cause more discomfort than earlobe piercings. Patience and consistent care ensure a smooth healing process and a stunning result.
2.3. Tragus Piercing: The Small Cartilage in Front of the Ear Canal
The tragus piercing targets the small cartilage flap in front of the ear canal. Known for its delicate appearance, it adds a unique touch to ear aesthetics. Healing typically takes 6-12 months, requiring diligent aftercare. Regular cleaning and avoiding irritants are crucial to prevent complications. While it may be more sensitive than other piercings, the tragus offers a distinctive style for those willing to maintain proper care and patience during the healing process.
2.4. Rook Piercing: The Upper Cartilage of the Ear
The rook piercing is situated on the thick upper cartilage of the ear, specifically in the ridge between the helix and anti-helix. This piercing is popular for its bold, edgy look and is often favored for its unique placement. Due to the thickness of the cartilage, healing times can be longer, typically ranging from 6 to 12 months. Proper aftercare is essential to ensure a smooth recovery and prevent complications. This piercing is ideal for those seeking a striking, standout style.

Preparing for an Ear Piercing
Preparing for an ear piercing involves cleaning the area with a gentle solution and using numbing cream to reduce discomfort. Ensure jewelry is high-quality and suitable for healing.
3.1. Choosing the Right Jewelry for Your Piercing
Selecting appropriate jewelry is crucial for smooth healing. Opt for high-quality, implant-grade materials like titanium or surgical stainless steel, which are hypoallergenic and minimize irritation. Avoid cheap metals that may cause allergic reactions. For initial piercings, stud earrings are recommended as they are less likely to irritate the area. Properly fitting jewelry ensures comfort and promotes healing. Always consult a professional for guidance on the best options for your piercing type.
3.2. Sanitizing the Area Before the Procedure
Sanitizing the area before piercing is essential to prevent infections. Wash your hands thoroughly with soap and water. Clean the ear with a saline solution or fragrance-free soap, ensuring both front and back are germ-free. Avoid using harsh chemicals or alcohol, as they can irritate the skin. Pat the area dry with a clean towel—do not rub. Keeping the area clean and dry minimizes the risk of complications and promotes a smooth piercing experience.

The Piercing Process
The piercing process involves creating a precise opening in the ear. Professionals use sterile tools to minimize discomfort and ensure safety, promoting smooth healing and optimal results.
4.1. What to Expect During the Piercing Session
During a piercing session, the area is cleaned and marked. The piercer uses sterile tools, ensuring precision. You may feel a pinch, but numbing cream can ease discomfort. After the piercing, they provide aftercare instructions to promote healing. The entire process is quick and professional, leaving you with a clean, new piercing ready for the healing journey ahead.
4.2. The Importance of Using Numbing Cream
Using numbing cream before a piercing can significantly reduce discomfort. It works by numbing the area, making the piercing process more comfortable. However, it won’t completely eliminate pain. Apply it as directed, usually 30 minutes before the session, to ensure effectiveness. While it enhances the experience, proper aftercare remains essential for healing. Remember, numbing cream is a helpful tool but not a substitute for professional technique and post-procedure care.

Aftercare and Healing
Proper aftercare is crucial for healing piercings. Keep the area clean, avoid irritants, and monitor for signs of healing or infection to ensure a smooth recovery process.
5.1. Daily Cleaning Routine for New Piercings
A daily cleaning routine is essential for proper healing. Wash your hands thoroughly before touching the piercing. Use a saline solution or mild soap to gently cleanse the area twice a day. Soak a clean cotton ball in the solution and dab it on the front and back of the piercing. Avoid using harsh chemicals or alcohol, as they can irritate the skin. Pat the area dry with a clean towel to prevent moisture buildup, which can lead to infection.
5.2. Avoiding Irritants During the Healing Process
To ensure proper healing, avoid exposing your piercing to irritants. Refrain from submerging it in water, such as pools or hot tubs, and avoid tight clothing that may rub against the area. Keep hair products, perfumes, and cosmetics away from the piercing to prevent chemical irritation. Smoking and excessive alcohol consumption can also slow healing and increase the risk of complications. Maintain a clean, dry environment to promote healing and minimize the chance of infection.
5.3. Signs of Proper Healing vs. Infection
Proper healing is marked by a piercing that appears pinkish, with minimal swelling that subsides within a few days. A thin, odorless crust may form around the jewelry. However, signs of infection include increased redness, swelling, pain, or thick, smelly discharge. If you notice warmth around the area or persistent tenderness, it may indicate an infection. Monitor these signs closely and consult a professional if concerns arise, as early treatment is crucial for resolving issues quickly.
When Can You Change Your Piercing Jewelry?
Earlobe piercings typically heal in 6-8 weeks, while cartilage piercings may take 3-4 months. Wait until the piercing is fully healed before changing jewelry, and consult a professional if unsure.
6.1. Recommended Timeframe for Different Ear Piercings
The healing timeframe varies depending on the piercing location. Earlobe piercings typically heal within 6-8 weeks, while cartilage piercings, such as helix or tragus, may take 3-6 months. Proper aftercare is essential during this period. It’s crucial to wait until the piercing is fully healed before changing jewelry to avoid complications. Consult a professional piercer to ensure the piercing is ready for jewelry changes, as rushing the process can lead to irritation or closure of the piercing hole.
6.2. How to Safely Remove and Replace Jewelry
Wash your hands thoroughly before handling your piercing. Gently clean the area and jewelry with saline solution. Carefully remove the old jewelry, ensuring not to force it. Insert the new piece at a slight angle, aligning it properly. Secure it firmly but avoid over-tightening. Clean the area again after replacement to maintain hygiene. If unsure, consult a professional piercer to avoid complications and ensure a smooth transition to new jewelry.

Common Mistakes to Avoid
Excessive touching, improper cleaning, and sleeping on the pierced ear can delay healing and cause infections. Avoid tight clothing and harsh products to ensure proper recovery.
7;1. Touching or Twisting the Jewelry Excessively
Excessive touching or twisting of jewelry can irritate the piercing site, delaying healing. This action introduces bacteria, increasing infection risks. Keep hands clean before handling jewelry. Avoid unnecessary manipulation, as it disrupts the healing process. Instead, clean the area gently with saline solution and avoid tight clothing that may cause friction. Proper care ensures a smooth recovery and prevents complications.
7.2. Sleeping on the Pierced Ear
Sleeping on a newly pierced ear can cause discomfort and delay healing. It may lead to redness, swelling, or even infection due to prolonged pressure. To avoid this, use a travel pillow or adjust your sleep position to avoid resting on the pierced ear. Keeping the area clean and avoiding tight bedding can also help. This habit is crucial to prevent complications and ensure proper healing. Always prioritize comfort and hygiene during recovery.

Troubleshooting Common Issues
Identify redness, swelling, or discharge as signs of potential infection. Use saline solution for cleaning, avoid irritants, and consult a professional if issues persist.

8.1. How to Treat Redness or Swelling
Redness or swelling around a piercing can indicate irritation or infection. Gently clean the area with saline solution 2-3 times daily. Avoid harsh chemicals or tight jewelry. Apply a cold compress to reduce swelling. Keep the area dry and avoid touching. If symptoms persist, consult a professional piercer or healthcare provider for further guidance. Proper aftercare is essential to prevent complications and promote healing.
8.2. Preventing and Treating Piercing Bumps
Piercing bumps, often caused by irritation or improper aftercare, can be prevented by keeping the area clean and avoiding tight jewelry. Gently cleanse with saline solution or mild soap daily. Apply a cold compress to reduce inflammation. Topical solutions like chamomile compresses may help soothe the bump. Avoid harsh chemicals or excessive touching. If bumps persist, consult a professional piercer for guidance. Proper care and patience are key to resolving this common issue effectively.
Ear piercing is a rewarding experience with proper care and patience, leading to a stylish and confident transformation. Thank you for following this guide!
9.1. Final Tips for a Successful Ear Piercing Experience
To ensure a smooth journey, keep your piercing clean, avoid irritants, and be patient during healing. Refrain from removing jewelry prematurely and avoid sleeping on pierced ears. Regular cleaning with mild soap and water is essential; Stay hydrated, eat well, and avoid tight clothing that may irritate the area. By following proper aftercare and staying consistent, you’ll enjoy a beautiful, healthy piercing that enhances your personal style and confidence.